Clay, Wood or Paper? Choosing a Material for a Small Relief
Choosing a material for a small relief is easier when you match texture, depth, tools and drying needs to the image you want to make.
You press a thumb into soft clay, and the mark stays put; a sheet of paper, meanwhile, buckles under the same enthusiasm. Choosing a material for a small relief starts with that difference: clay, wood and layered paper each offer a distinct way to build texture and depth, and each has its own ordinary ways of resisting you.
A relief is an image that rises from a supporting surface rather than standing free. For a modest decorative piece, the useful question is not which material is best, but which one suits the marks you want to make and the tools you can use comfortably. The trouble usually begins when the material is asked to behave like another one.
Choose the material by the marks you want
Clay is the most direct choice for rounded forms, soft transitions and marks made by pressing, pinching or adding small pieces. A wooden modeling tool, blunt pencil or fingertip can shape its surface. It is forgiving while workable, but it changes as it dries and may need firing or a suitable air-drying product, depending on the clay.
Wood favors cut and carved marks. A shallow relief in basswood or another carving wood can hold crisp edges, ridges and broad planes. The material itself supplies a firm boundary: forms cannot simply be pressed outward, and detail depends on removing material with appropriate carving tools. For a beginner, a small pre-cut panel and a design with uncluttered shapes keep the task manageable.
Layered paper makes depth by stacking shapes rather than modeling or carving them. Cardstock, handmade paper and thin colored sheets can create terraces, overlaps and clean silhouettes. A craft knife, scissors, cutting mat and glue are common companions. Paper is well suited to graphic shapes and repeated layers; it is less suited to rounded modeling unless folds, rolled forms or crumpled elements are part of the design.
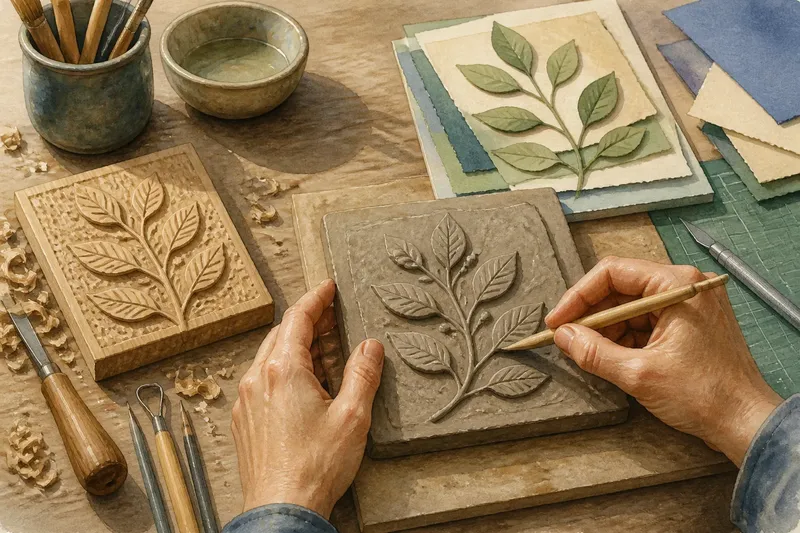
Say you want to depict a sprig of leaves with raised veins and a soft, irregular background. Imagine shaping it in air-dry clay: you could press a shallow field, add the leaves, then impress the veins with a blunt tool. The expected observable result is a continuous surface with rounded transitions. In paper, the same sprig would read as separate cut shapes and stacked edges; in wood, it would become a set of carved planes. The image stays recognizable, but the material changes its accent.
When a surface cracks, curls or splinters
Cracks in clay often appear when thick and thin areas dry at different rates, when joins are weak, or when the clay is too dry to bond cleanly. Keep the relief modest in thickness, press added pieces firmly into a slightly damp surface, and avoid attaching a large, heavy lump to a thin base. If a crack opens while the clay is still workable, smooth or join it gently; once the piece has dried, follow the product maker’s repair guidance rather than wetting it at random.
Paper curls when one face absorbs more moisture from glue than the other, or when the sheet is too light for the layers attached to it. Use a firm backing, apply glue sparingly and spread it rather than leaving wet pools. Let each layer settle under a clean, flat weight with a protective scrap sheet between the work and the weight. If the design depends on a loose curl or lifted edge, treat that as a deliberate form rather than trying to flatten every part.
Wood may splinter when a cut runs against the grain, when a tool is dull, or when too much material is removed in one pass. A relief design that crosses grain in several directions can also make carving less predictable. Work with small, controlled cuts and keep the shapes broad enough that fragile slivers are not doing important visual work. For carving that requires sharp tools or unfamiliar techniques, use appropriate instruction and safety practices; do not improvise around a slipping blade.
When the depth looks weak or crowded
A shallow relief can look flat if every form rises by the same amount. In clay, use a restrained hierarchy: let the main form stand slightly forward, keep supporting forms lower, and press background texture into the base. In wood, leave the central shape as a broad plane and lower the surrounding field. In paper, vary the number of layers or overlap shapes so the front and back are easy to distinguish.
The opposite problem is a crowded relief in which every mark competes. Reduce the number of raised details before adding finer ones. A few clear changes in height usually read more easily than a forest of tiny ridges, especially on a small panel. Leave some quiet area around the main shape; negative space is not a failure to decorate.
When details disappear or edges look rough
Fine detail can vanish in clay if it is pressed too softly, smudged during handling or placed in a surface that is already busy. Make important lines broad enough to remain visible, and use a blunt point for impressions rather than repeatedly scratching at the same groove. If the clay is sticking to tools, pause and let its surface firm slightly instead of dusting it with an unknown substance.
In wood, rough edges may come from a blunt tool, a cut that lifts fibers, or a design with corners too delicate for the grain. Simplify fragile shapes and refine the surface with suitable abrasive materials after carving. In paper, ragged edges often come from a dull blade, unsupported cuts or forcing thick material through scissors. Replace or sharpen the cutting edge as appropriate, secure the sheet on a cutting mat and turn the work to make the cut more comfortable.
For all three materials, scale matters. A line that seems generous on a sketch may become too narrow to shape or preserve on the final piece. Draw the design at its intended size, mark the areas that must remain raised, and remove decorative marks that would crowd them.
How should you choose a material for a small relief?
Which material is easiest to shape without carving?
Clay is generally the most direct option if you want to press, pinch and add forms. Layered paper also avoids carving, but its shapes are built by cutting and stacking rather than by molding.
Which material gives the crispest layered edges?
Paper gives a clear edge wherever one cut layer overlaps another. Wood can make crisp carved boundaries too, but the result depends more on grain, tool control and the design’s depth.
Can a beginner make a relief without a kiln?
Air-drying clay is an option when its intended use and care instructions suit the project; it does not need a kiln, though it may not behave like fired clay. Paper requires no firing, while wood requires suitable tools and a safe, stable work surface.
What should I use for a rounded, organic design?
Clay is a natural fit for soft, continuous curves and pressed textures. Paper can suggest rounded forms through folded or rolled pieces, while wood tends to express the same subject through carved planes.
Match the material to the room and the finished piece
Before choosing, consider where the relief will sit and how it will be handled. A paper piece may need protection from damp conditions and careless fingers. Clay and wood also have material-specific care needs, and finishes can change color, sheen and surface feel. Follow the label and manufacturer instructions for the material, adhesive, coating or tools you choose.
For a first attempt, keep the design to a few large forms, make a small sketch at the intended scale, and decide how the depth will be created before preparing the surface. Clay suits pressing and soft transitions; wood suits deliberate cuts and carved planes; layered paper suits graphic silhouettes and stacked edges. Choosing a material for a small relief becomes simpler when the image is described in verbs: press, carve or layer. That choice gives the work a coherent character before the first mark is made.